一、Linux设备分类
Linux系统为了管理方便,将设备分成三种基本类型:
- 字符设备
- 块设备
- 网络设备
字符设备:
字符(char)设备是个能够像字节流(类似文件)一样被访问的设备,由字符设备驱动程序来实现这种特性。字符设备驱动程序通常至少要实现open、close、read和write的系统调用。
字符终端(/dev/console)和串口(/dev/ttyS0以及类似设备)就是两个字符设备,它们能很好的说明“流”这种抽象概念。
字符设备可以通过文件节点来访问,比如/dev/tty1和/dev/lp0等。这些设备文件和普通文件之间的唯一差别在于对普通文件的访问可以前后移动访问位置,而大多数字符设备是一个只能顺序访问的数据通道。然而,也存在具有数据区特性的字符设备,访问它们时可前后移动访问位置。例如framebuffer就是这样的一个设备,app可以用mmap或lseek访问抓取的整个图像。
在/dev下执行ls -l ,可以看到很多创建好的设备节点:

块设备:
和字符设备类似,块设备也是通过/dev目录下的文件系统节点来访问。块设备(例如磁盘)上能够容纳filesystem。在大多数的Unix系统中,进行I/O操作时块设备每次只能传输一个或多个完整的块,而每块包含512字节(或2的更高次幂字节的数据)。
Linux可以让app像字符设备一样地读写块设备,允许一次传递任意多字节的数据。因此,块设备和字符设备的区别仅仅在于内核内部管理数据的方式,也就是内核及驱动程序之间的软件接口,而这些不同对用户来讲是透明的。在内核中,和字符驱动程序相比,块驱动程序具有完全不同的接口。
块设备文件(类型为b):

网络设备:
任何网络事物都需要经过一个网络接口形成,网络接口是一个能够和其他主机交换数据的设备。接口通常是一个硬件设备,但也可能是个纯软件设备,比如回环(loopback)接口。
网络接口由内核中的网络子系统驱动,负责发送和接收数据包。许多网络连接(尤其是使用TCP协议的连接)是面向流的,但网络设备却围绕数据包的传送和接收而设计。网络驱动程序不需要知道各个连接的相关信息,它只要处理数据包即可。
由于不是面向流的设备,因此将网络接口映射到filesystem中的节点(比如/dev/tty1)比较困难。
Unix访问网络接口的方法仍然是给它们分配一个唯一的名字(比如eth0),但这个名字在filesystem中不存在对应的节点。内核和网络设备驱动程序间的通信,完全不同于内核和字符以及块驱动程序之间的通信,内核调用一套和数据包相关的函数socket,也叫套接字。
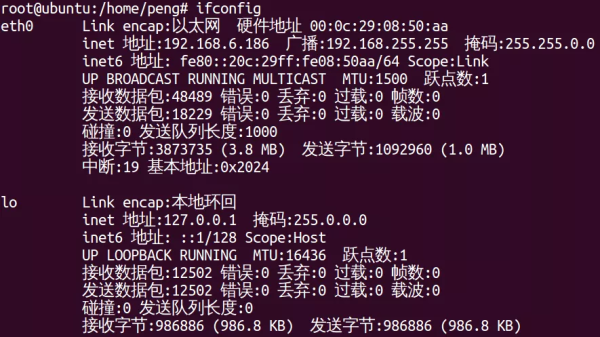
查看网络设备使用命令ifconfig:
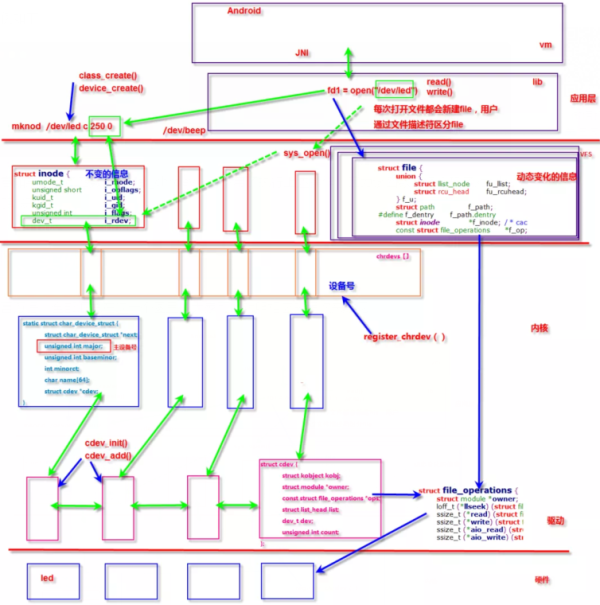
在Linux的世界里面一切皆文件,所有的硬件设备操作到应用层都会被抽象成文件的操作。我们知道如果应用层要访问硬件设备,它必定要调用到硬件对应的驱动程序。Linux内核中有那么多驱动程序,应用层怎么才能精确的调用到底层的驱动程序呢?
在这里我们字符设备为例,来看一下应用程序是如何和底层驱动程序关联起来的。必须知道的基础知识:
1.在Linux文件系统中,每个文件都用一个struct inode结构体来描述,这个结构体里面记录了这个文件的所有信息,例如:文件类型,访问权限等。
2.在Linux操作系统中,每个驱动程序在应用层的/dev目录下都会有一个设备文件和它对应,并且该文件会有对应的主设备号和次设备号。
3.在Linux操作系统中,每个驱动程序都要分配一个主设备号,字符设备的设备号保存在struct cdev结构体中。
struct cdev {
       struct kobject kobj;
       struct module *owner;
       const struct file_operations *ops;//接口函数集合
       struct list_head list;//内核链表
       dev_t dev;    //设备号
       unsigned int count;//次设备号个数
   };
4.在Linux操作系统中,每打开一次文件,Linux操作系统在VFS层都会分配一个struct file结构体来描述打开的这个文件。该结构体用于维护文件打开权限、文件指针偏移值、私有内存地址等信息。
注意:
常常我们认为struct inode描述的是文件的静态信息,即这些信息很少会改变。而struct file描述的是动态信息,即在对文件的操作的时候,struct file里面的信息经常会发生变化。典型的是struct file结构体里面的f_pos(记录当前文件的位移量),每次读写一个普通文件时f_ops的值都会发生改变。
这几个结构体关系如下图所示:
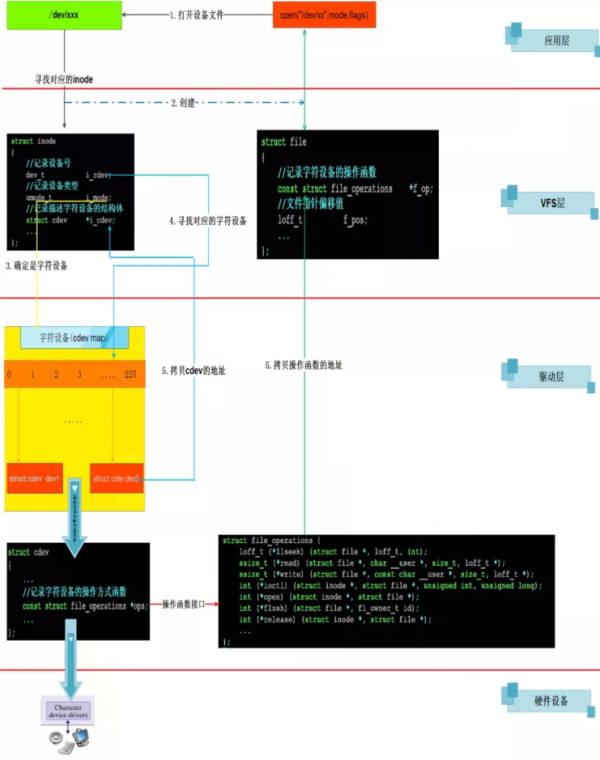
- 1.当open函数打开设备文件时,可以根据设备文件对应的struct inode结构体描述的信息,可以知道接下来要操作的设备类型(字符设备还是块设备)。还会分配一个struct file结构体。
- 2.根据struct inode结构体里面记录的设备号,可以找到对应的驱动程序。这里以字符设备为例。在Linux操作系统中每个字符设备有一个struct cdev结构体。此结构体描述了字符设备所有的信息,其中最重要一项的就是字符设备的操作函数接口。
- 3.找到struct cdev结构体后,Linux内核就会将struct cdev结构体所在的内存空间首地记录在struct inode结构体的i_cdev成员中。将struct cdev结构体的中记录的函数操作接口地址记录在struct file结构体的f_op成员中。
- 4.任务完成,VFS层会给应用层返回一个文件描述符(fd)。这个fd是和struct file结构体对应的。接下来上层的应用程序就可以通过fd来找到strut file,然后在由struct file找到操作字符设备的函数接口了。
三、字符驱动相关函数分析
/**
 * cdev_init() - initialize a cdev structure
 * @cdev: the structure to initialize
 * @fops: the file_operations for this device
 *
 * Initializes @cdev, remembering @fops, making it ready to add to the
 * system with cdev_add().
 */
void cdev_init(struct cdev *cdev, const struct file_operations *fops)
功能:
  初始化cdev结构体
参数:
  @cdev cdev结构体地址
  @fops 操作字符设备的函数接口地址
返回值:
  无
/**
 * register_chrdev_region() - register a range of device numbers
 * @from: the first in the desired range of device numbers; must include
 *        the major number.
 * @count: the number of consecutive device numbers required
 * @name: the name of the device or driver.
 *
 * Return value is zero on success, a negative error code on failure.
 */
int register_chrdev_region(dev_t from, unsigned count, const char *name)
功能:
  注册一个范围()的设备号
参数:
  @from 设备号
  @count 注册的设备个数
  @name 设备的名字
返回值:
  成功返回0,失败返回错误码(负数)
/**
 * cdev_add() - add a char device to the system
 * @p: the cdev structure for the device
 * @dev: the first device number for which this device is responsible
 * @count: the number of consecutive minor numbers corresponding to this
 *         device
 *
 * cdev_add() adds the device represented by @p to the system, making it
 * live immediately.  A negative error code is returned on failure.
 */
int cdev_add(struct cdev *p, dev_t dev, unsigned count)
功能:
  添加一个字符设备到操作系统
参数:
  @p cdev结构体地址
  @dev 设备号
  @count 次设备号个数
返回值:
  成功返回0,失败返回错误码(负数)
/**
 * cdev_del() - remove a cdev from the system
 * @p: the cdev structure to be removed
 *
 * cdev_del() removes @p from the system, possibly freeing the structure
 * itself.
 */
void cdev_del(struct cdev *p)
功能:
  从系统中删除一个字符设备
参数:
  @p cdev结构体地址
返回值:
  无
static inline int register_chrdev(unsigned int major, const char *name,
          const struct file_operations *fops)

功能:
  注册或者分配设备号,并注册fops到cdev结构体,
  如果major>0,功能为注册该主设备号,
  如果major=0,功能为动态分配主设备号。
参数:
  @major : 主设备号
  @name : 设备名称,执行 cat /proc/devices显示的名称
  @fops  : 文件系统的接口指针
返回值
  如果major>0   成功返回0,失败返回负的错误码
  如果major=0  成功返回主设备号,失败返回负的错误码
该函数实现了对cdev的初始化和注册的封装,所以调用该函数之后就不需要自己操作cdev了。
相对的注销函数为unregister_chrdev
static inline void unregister_chrdev(unsigned int major, const char *name)
四、如何编写字符设备驱动
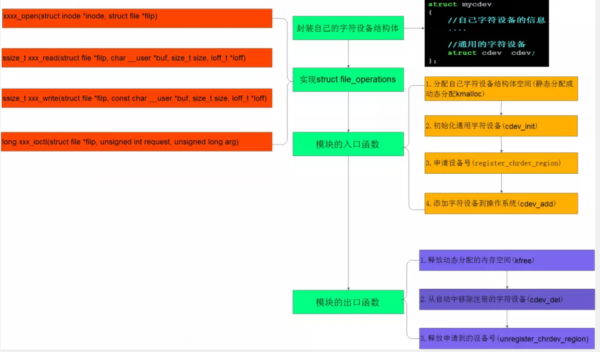
1. 实现模块加载和卸载入口函数
module_init (hello_init);
module_exit (hello_exit);
2. 申请主设备号
申请主设备号 (内核中用于区分和管理不同字符设备)
register_chrdev_region (devno, number_of_devices, "hello");
3. 创建设备节点
创建设备节点文件 (为用户提供一个可操作到文件接口–open()) 创建设备节点有两种方式:手动方式创建,函数自动创建。手动创建:
mknod /dev/hello c 250 0
自动创建设备节点
除了使用mknod命令手动创建设备节点,还可以利用linux的udev、mdev机制,而我们的ARM开发板上移植的busybox有mdev机制,那么就使用mdev机制来自动创建设备节点。
在etc/init.d/rcS文件里有一句:
echo /sbin/mdev > /proc/sys/kernel/hotplug
该名命令就是用来自动创建设备节点。
udev 是一个工作在用户空间的工具,它能根据系统中硬件设备的状态动态的更新设备文件,包括设备文件的创建,删除,权限等。这些文件通常都定义在/dev 目录下,但也可以在配置文件中指定。udev 必须有内核中的sysfs和tmpfs支持,sysfs 为udev 提供设备入口和uevent 通道,tmpfs 为udev 设备文件提供存放空间。
udev 运行在用户模式,而非内核中。udev 的初始化脚本在系统启动时创建设备节点,并且当插入新设备——加入驱动模块——在sysfs上注册新的数据后,udev会创新新的设备节点。
注意,udev 是通过对内核产生的设备文件修改,或增加别名的方式来达到自定义设备文件的目的。但是,udev 是用户模式程序,其不会更改内核行为。也就是说,内核仍然会创建sda,sdb等设备文件,而udev可根据设备的唯一信息来区分不同的设备,并产生新的设备文件(或链接)。
例如:
如果驱动模块可以将自己的设备号作为内核参数导出,在sysfs文件中就有一个叫做uevent文件记录它的值。
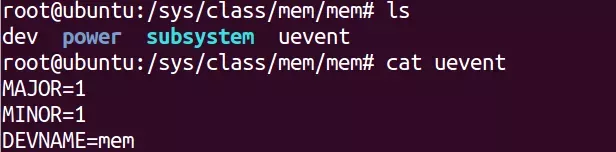
在Linux应用层启动一个udev程序,这个程序的第一次运行的时候,会遍历/sys目录,寻找每个子目录的uevent文件,从这些uevent文件中获取创建设备节点的信息,然后调用mknod程序在/dev目录下创建设备节点。结束之后,udev就开始等待内核空间的event。这个设备模型的东西,我们在后面再详细说。这里大就可以这样理解,在Linux内核中提供了一些函数接口,通过这些函数接口,我们可在sysfs文件系统中导出我们的设备号的值,导出值之后,内核还会向应用层上报event。此时udev就知道有活可以干了,它收到这个event后,就读取event对应的信息,接下来就开始创建设备节点啦。
如何创建一个设备类?
第一步 :通过宏class_create() 创建一个class类型的对象;
/* This is a #define to keep the compiler from merging different
 * instances of the __key variable */
#define class_create(owner, name)
({
  static struct lock_class_key __key;
  __class_create(owner, name, &__key);
})

参数:
  @owner  THIS_MODULE
  @name   类名字
返回值
  可以定义一个struct class的指针变量cls接受返回值,然后通过IS_ERR(cls)判断
  是否失败,如果成功这个宏返回0,失败返回非9值(可以通过PTR_ERR(cls)来获得
  失败返回的错误码)
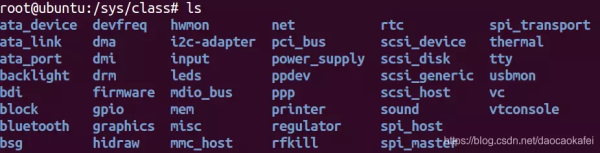
在Linux内核中,把设备进行了分类,同一类设备可以放在同一个目录下,该函数启示就是创建了一个类,例如:
/**
 * device_create - creates a device and registers it with sysfs
 * @class: pointer to the struct class that this device should be registered to
 * @parent: pointer to the parent struct device of this new device, if any
 * @devt: the dev_t for the char device to be added
 * @drvdata: the data to be added to the device for callbacks
 * @fmt: string for the device's name
 *
 * This function can be used by char device classes.  A struct device
 * will be created in sysfs, registered to the specified class.
 *
 * A "dev" file will be created, showing the dev_t for the device, if
 * the dev_t is not 0,0.
 * If a pointer to a parent struct device is passed in, the newly created
 * struct device will be a child of that device in sysfs.
 * The pointer to the struct device will be returned from the call.
 * Any further sysfs files that might be required can be created using this
 * pointer.
 *
 * Returns &struct device pointer on success, or ERR_PTR() on error.
 *
 * Note: the struct class passed to this function must have previously
 * been created with a call to class_create().
 */
struct device *device_create(struct class *class, struct device *parent,
           dev_t devt, void *drvdata, const char *fmt, ...)
自动创建设备节点使用实例:
static struct class *cls;
static struct device *test_device;

  devno = MKDEV(major,minor);
  cls = class_create(THIS_MODULE,"helloclass");
  if(IS_ERR(cls))
  {
    unregister_chrdev(major,"hello");
    return result;
  }
  test_device = device_create(cls,NULL,devno,NULL,"hellodevice");
  if(IS_ERR(test_device ))
  {
    class_destroy(cls);
    unregister_chrdev(major,"hello");
    return result;
  }
4 实现file_operations
static const struct file_operations fifo_operations = {
    .owner =   THIS_MODULE,
    .open =   dev_fifo_open,
    .read =   dev_fifo_read,
    .write =   dev_fifo_write,
    .unlocked_ioctl =   dev_fifo_unlocked_ioctl,
};
open、release对应应用层的open()、close()函数。实现比较简单,
直接返回0即可。 其中read、write、unloched_ioctrl 函数的实现需要涉及到用户空间 和内存空间的数据拷贝。
在Linux操作系统中,用户空间和内核空间是相互独立的。也就是说内核空间是不能直接访问用户空间内存地址,同理用户空间也不能直接访问内核空间内存地址。
如果想实现,将用户空间的数据拷贝到内核空间或将内核空间数据拷贝到用户空间,就必须借助内核给我们提供的接口来完成。
1. read接口实现
用户空间–>内核空间
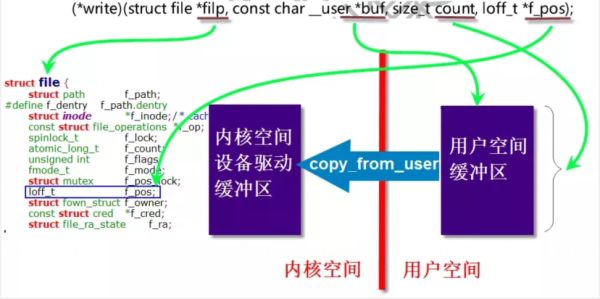
字符设备的write接口定义如下:
ssize_t (*write)(struct file *filp, const char __user *buf, size_t count, loff_t *f_pos);
参数:
  filp:待操作的设备文件file结构体指针
  buf:待写入所读取数据的用户空间缓冲区指针
  count:待读取数据字节数
  f_pos:待读取数据文件位置,写入完成后根据实际写入字节数重新定位
返回:
  成功实际写入的字节数,失败返回负值
如果该操作为空,将使得write系统调用返回负EINVAL失败,正常返回实际写入的字节数。
用户空间向内核空间拷贝数据需要使用copy_from_user函数,该函数定义在arch/arm/include/asm/uaccess.h中。
static inline int copy_from_user(void *to, const void __user volatile *from,unsigned long n)
参数:
  to:目标地址(内核空间)
  from:源地址(用户空间)
  n:将要拷贝数据的字节数
返回:
  成功返回0,失败返回没有拷贝成功的数据字节数
还可以使用get_user宏:
int get_user(data, ptr);
参数:
  data:可以是字节、半字、字、双字类型的内核变量
  ptr:用户空间内存指针
返回:
  成功返回0,失败返回非0
2. write接口实现
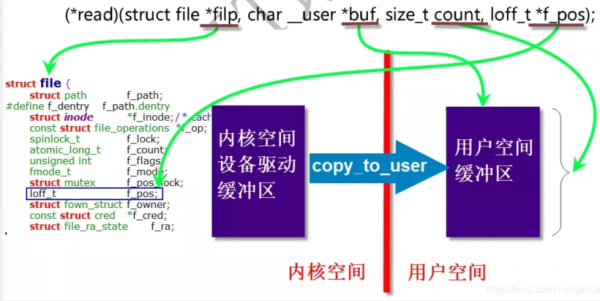
内核空间–>用户空间
字符设备的read接口定义如下:
ssize_t (*read)(struct file *filp, char __user *buf, size_t  count, lofft *f_pos);
参数:
  filp: 待操作的设备文件file结构体指针
  buf:  待写入所读取数据的用户空间缓冲区指针
  count:待读取数据字节数
  f_pos:待读取数据文件位置,读取完成后根据实际读取字节数重新定位
  __user :是一个空的宏,主要用来显示的告诉程序员它修饰的指针变量存放的是用户空间的地址。

返回值:
  成功实际读取的字节数,失败返回负值
注意:如果该操作为空,将使得read系统调用返回负EINVAL失败,正常返回实际读取的字节数。
用户空间从内核空间读取数据需要使用copy_to_user函数:
static inline int copy_to_user(void __user volatile *to, const void *from,unsigned long n)
数:
 to:目标地址(用户空间)
 from:源地址(内核空间)
 n:将要拷贝数据的字节数
回:
 成功返回0,失败返回没有拷贝成功的数据字节数
在这里插入图片描述
还可以使用put_user宏:
int put_user(data, prt)
参数:
  data:可以是字节、半字、字、双字类型的内核变量
  ptr:用户空间内存指针
返回:
  成功返回0, 失败返回非0
这样我们就可以实现read、write函数了,实例如下:
ssize_t hello_read (struct file *filp, char *buff, size_t count, loff_t *offp)
{
ssize_t result = 0;
if (count > 127)
count = 127;
if (copy_to_user (buff, data, count))
{
result = -EFAULT;
}
else
{
printk (KERN_INFO "wrote %d bytesn", count);
result = count;
}
return result;
}
ssize_t hello_write (struct file *filp,const char *buf, size_t count, loff_t *f_pos)
{
ssize_t ret = 0;
//printk (KERN_INFO "Writing %d bytesn", count);
if (count > 127) return -ENOMEM;
if (copy_from_user (data, buf, count)) {
ret = -EFAULT;
}
else {
data[count] = '�';
printk (KERN_INFO"Received: %sn", data);
ret = count;
}
return ret;
}
3. unlocked_ioctl接口实现
(1)为什么要实现xxx_ioctl ?
前面我们在驱动中已经实现了读写接口,通过这些接口我们可以完成对设备的读写。但是很多时候我们的应用层工程师除了要对设备进行读写数据之外,还希望可以对设备进行控制。例如:针对串口设备,驱动层除了需要提供对串口的读写之外,还需提供对串口波特率、奇偶校验位、终止位的设置,这些配置信息需要从应用层传递一些基本数据,仅仅是数据类型不同。
通过xxx_ioctl函数接口,可以提供对设备的控制能力,增加驱动程序的灵活性。
(2)如何实现xxx_ioctl函数接口?
增加xxx_ioctl函数接口,应用层可以通过ioctl系统调用,根据不同的命令来操作dev_fifo。
kernel 2.6.35 及之前的版本中struct file_operations 一共有3个ioctl :ioctl,unlocked_ioctl和compat_ioctl 现在只有unlocked_ioctl和compat_ioctl 了
在kernel 2.6.36 中已经完全删除了struct file_operations 中的ioctl 函数指针,取而代之的是unlocked_ioctl 。
· 2.6.36 之前的内核
long (ioctl) (struct inode node ,struct file* filp, unsigned int cmd,unsigned long arg)
· 2.6.36之后的内核
long (*unlocked_ioctl) (struct file *filp, unsigned int cmd, unsigned long arg)
参数cmd: 通过应用函数ioctl传递下来的命令
先来看看应用层的ioctl和驱动层的xxx_ioctl对应关系:
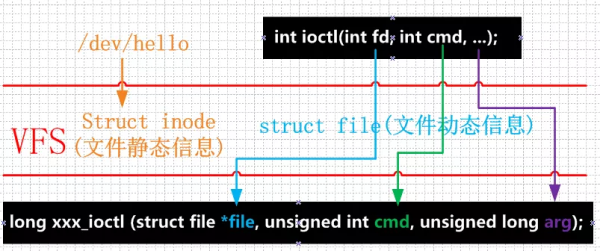
int ioctl(int fd, int cmd, ...);
参数:
@fd:打开设备文件的时候获得文件描述符
@ cmd:第二个参数:给驱动层传递的命令,需要注意的时候,驱动层的命令和应用层的命令一定要统一
@第三个参数: "..."在C语言中,很多时候都被理解成可变参数。
返回值
       成功:0
       失败:-1,同时设置errno
小贴士:
-
- 当我们通过ioctl调用驱动层xxx_ioctl的时候,有三种情况可供选择:
- 1: 不传递数据给xxx_ioctl
- 2: 传递数据给xxx_ioctl,希望它最终能把数据写入设备(例如:设置串口的波特率)
- 3: 调用xxxx_ioctl希望获取设备的硬件参数(例如:获取当前串口设备的波特率)
- 这三种情况中,有些时候需要传递数据,有些时候不需要传递数据。在C语言中,是
- 无法实现函数重载的。那怎么办?用“…”来欺骗编译器了,“…”本来的意思是传
- 递多参数。在这里的意思是带一个参数还是不带参数。
- 参数可以传递整型值,也可以传递某块内存的地址,内核接口函数必须根据实际情况
- 提取对应的信息。
long (*unlocked_ioctl) (struct file *file, unsigned int cmd, unsigned long arg);
参数:
@file:   vfs层为打开字符设备文件的进程创建的结构体,用于存放文件的动态信息
@ cmd: 用户空间传递的命令,可以根据不同的命令做不同的事情
@第三个参数: 用户空间的数据,主要这个数据可能是一个地址值(用户空间传递的是一个地址),也可能是一个数值,也可能没值
返回值
       成功:0
       失败:带错误码的负值
<3>如何确定cmd 的值。
该值主要用于区分命令的类型,虽然我只需要传递任意一个整型值即可,但是我们尽量按照内核规范要求,充分利用这32bite的空间,如果大家都没有规矩,又如何能成方圆?
现在我就来看看,在Linux 内核中这个cmd是如何设计的吧!

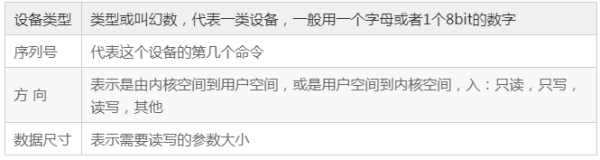
由上可以一个命令由4个部分组成,每个部分需要的bite都不完全一样,制作一个命令需要在不同的位域写不同的数字,Linux 系统已经给我们封装好了宏,我们只需要直接调用宏来设计命令即可。
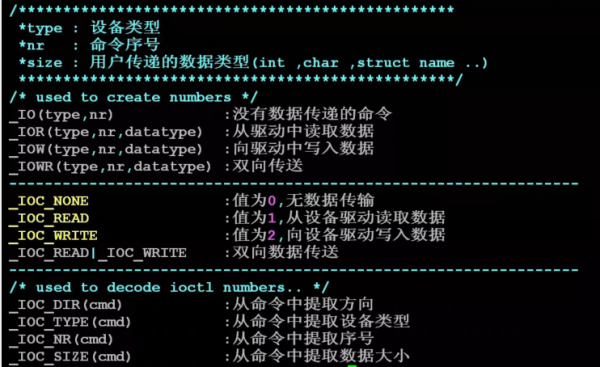
通过Linux 系统给我们提供的宏,我们在设计命令的时候,只需要指定设备类型、命令序号,数据类型三个字段就可以了。
<4> 如何检查命令?
可以通过宏_IOC_TYPE(nr)来判断应用程序传下来的命令type是否正确;
可以通过宏_IOC_DIR(nr)来得到命令是读还是写,然后再通过宏access_ok(type,addr,size)来判断用户层传递的内存地址是否合法。
使用方法如下:
if(_IOC_TYPE(cmd)!=DEV_FIFO_TYPE){
   pr_err("cmd   %u,bad magic 0x%x/0x%x.n",cmd,_IOC_TYPE(cmd),DEV_FIFO_TYPE);
   return-ENOTTY;
 }
 if(_IOC_DIR(cmd)&_IOC_READ)
   ret=!access_ok(VERIFY_WRITE,(void __user*)arg,_IOC_SIZE(cmd));
 else if( _IOC_DIR(cmd)&_IOC_WRITE )
   ret=!access_ok(VERIFY_READ,(void   __user*)arg,_IOC_SIZE(cmd));
 if(ret){
   pr_err("bad   access %ld.n",ret);
   return-EFAULT;
 }
5 注册cdev
定义好file_operations结构体,就可以通过函数cdev_init()、cdev_add()注册字符设备驱动了。
实例如下:
static struct cdev cdev;
cdev_init(&cdev,&hello_ops);
error = cdev_add(&cdev,devno,1);
注意如果使用了函数register_chrdev(),就不用了执行上述操作,因为该函数已经实现了对cdev的封装。
五、实例
千言万语,全部汇总在这一个图里,大家可以对照相应的层次来学习。
好了,现在我们可以来实现一个完整的字符设备框架的实例,包括打开、关闭、读写、ioctrl、自动创建设备节点等功能。
#include <linux/init.h>
#include <linux/module.h>
#include <linux/cdev.h>
#include <linux/fs.h>
#include <linux/device.h>
#include <linux/slab.h>
#include <asm/uaccess.h>
#include "dev_fifo_head.h"

//指定的主设备号
#define   MAJOR_NUM 250

//自己的字符设备
struct mycdev
{
    int len;
    unsigned   char buffer[50];
    struct   cdev cdev;
};

MODULE_LICENSE("GPL");
//设备号
static dev_t   dev_num = {0};
//全局gcd
struct mycdev *gcd;
//设备类
struct class *cls;
//获得用户传递的数据,根据它来决定注册的设备个数
static int ndevices = 1;
module_param(ndevices, int, 0644);
MODULE_PARM_DESC(ndevices, "The number of devices for register.n");

//打开设备
static int dev_fifo_open(struct   inode *inode,   struct file *file)
{
    struct   mycdev *cd;

    printk("dev_fifo_open   success!n");
    //用struct file的文件私有数据指针保存struct mycdev结构体指针
    cd   = container_of(inode->i_cdev,struct   mycdev,cdev);
    file->private_data =   cd;
    return   0;
}

//读设备
static ssize_t   dev_fifo_read(struct file *file, char   __user *ubuf,   size_t
size, loff_t *ppos)
{
    int n;
    int ret;
    char   *kbuf;
    struct   mycdev *mycd =   file->private_data;

    printk("read *ppos :   %lldn",*ppos);

    if(*ppos == mycd->len)
        return   0;

    //请求大大小 > buffer剩余的字节数   :读取实际记得字节数
    if(size > mycd->len - *ppos)
        n = mycd->len - *ppos;
    else
        n = size;

    printk("n =   %dn",n);
    //从上一次文件位置指针的位置开始读取数据
    kbuf   = mycd->buffer   + *ppos;
    //拷贝数据到用户空间
    ret   = copy_to_user(ubuf,kbuf, n);
    if(ret != 0)
        return   -EFAULT;

    //更新文件位置指针的值
    *ppos += n;
    printk("dev_fifo_read   success!n");
    return   n;
}
//写设备
static ssize_t   dev_fifo_write(struct file *file, const char __user *ubuf,size_t size, loff_t *ppos)
{
    int n;
    int ret;
    char   *kbuf;
    struct   mycdev *mycd =   file->private_data;

    printk("write *ppos :   %lldn",*ppos);
    //已经到达buffer尾部了
    if(*ppos == sizeof(mycd->buffer))
       return   -1;
    //请求大大小 > buffer剩余的字节数(有多少空间就写多少数据)
    if(size > sizeof(mycd->buffer) - *ppos)
        n = sizeof(mycd->buffer) - *ppos;
    else
        n = size;
    //从上一次文件位置指针的位置开始写入数据

    kbuf   = mycd->buffer   + *ppos;
    //拷贝数据到内核空间
    ret   = copy_from_user(kbuf, ubuf, n);
    if(ret != 0)
        return   -EFAULT;

    //更新文件位置指针的值
    *ppos += n;
    //更新dev_fifo.len
    mycd->len += n;
    printk("dev_fifo_write   success!n");
    return   n;
}

//linux 内核在2.6以后,已经废弃了ioctl函数指针结构,取而代之的是

long   dev_fifo_unlocked_ioctl(struct file *file,   unsigned int cmd,
    unsigned   long arg)
{
  int ret = 0;
  struct mycdev *mycd   = file->private_data;

  if(_IOC_TYPE(cmd)!=DEV_FIFO_TYPE){
    pr_err("cmd   %u,bad magic 0x%x/0x%x.n",cmd,_IOC_TYPE(cmd),DEV_FIFO_TYPE);
    return-ENOTTY;
  }
  if(_IOC_DIR(cmd)&_IOC_READ)
    ret=!access_ok(VERIFY_WRITE,(void __user*)arg,_IOC_SIZE(cmd));
  else if( _IOC_DIR(cmd)&_IOC_WRITE )
    ret=!access_ok(VERIFY_READ,(void   __user*)arg,_IOC_SIZE(cmd));
  if(ret){
    pr_err("bad   access %ld.n",ret);
    return-EFAULT;
  }
    switch(cmd)
    {
      case DEV_FIFO_CLEAN:
         printk("CMD:CLEANn");
      memset(mycd->buffer, 0, sizeof(mycd->buffer));
         break;
      case DEV_FIFO_SETVALUE:
         printk("CMD:SETVALUEn");
         mycd->len = arg;
         break;
      case DEV_FIFO_GETVALUE:
         printk("CMD:GETVALUEn");
         ret   = put_user(mycd->len, (int *)arg);
         break;
      default:
         return   -EFAULT;
    }
    return   ret;
}

//设备操作函数接口

static const struct file_operations fifo_operations = {
    .owner =   THIS_MODULE,
    .open =   dev_fifo_open,
    .read =   dev_fifo_read,
    .write =   dev_fifo_write,
    .unlocked_ioctl =   dev_fifo_unlocked_ioctl,
};
//模块入口
int __init dev_fifo_init(void)
{
    int i = 0;
    int n = 0;
    int ret;

    struct   device *device;
  gcd   = kzalloc(ndevices   * sizeof(struct   mycdev), GFP_KERNEL);

    if(!gcd){
        return   -ENOMEM;
    }

    //设备号 : 主设备号(12bit) | 次设备号(20bit)
    dev_num   = MKDEV(MAJOR_NUM, 0);
    //静态注册设备号
    ret   = register_chrdev_region(dev_num,ndevices,"dev_fifo");
    if(ret < 0){
    //静态注册失败,进行动态注册设备号
     ret   =alloc_chrdev_region(&dev_num,0,ndevices,"dev_fifo");
      if(ret < 0){
        printk("Fail to register_chrdev_regionn");
        goto   err_register_chrdev_region;
      }
    }
    //创建设备类
    cls   = class_create(THIS_MODULE, "dev_fifo");
    if(IS_ERR(cls)){
        ret   = PTR_ERR(cls);
        goto   err_class_create;
    }
    printk("ndevices :   %dn",ndevices);
    for(n = 0;n < ndevices;n   ++)
    {
      //初始化字符设备
      cdev_init(&gcd[n].cdev,&fifo_operations);
      //添加设备到操作系统
      ret   = cdev_add(&gcd[n].cdev,dev_num + n,1);
      if (ret < 0)
      {
         goto   err_cdev_add;
      }
     //导出设备信息到用户空间(/sys/class/类名/设备名)
      device   = device_create(cls,NULL,dev_num +n,NULL,"dev_fifo%d",n);
      if(IS_ERR(device)){
         ret   = PTR_ERR(device);
         printk("Fail to device_createn");
         goto   err_device_create;
      }
    }
    printk("Register   dev_fito to system,ok!n");
    return   0;
err_device_create:

    //将已经导出的设备信息除去
    for(i = 0;i < n;i ++)
    {
       device_destroy(cls,dev_num + i);
    }
err_cdev_add:
    //将已经添加的全部除去
    for(i = 0;i < n;i ++)
    {
       cdev_del(&gcd[i].cdev);
    }
err_class_create:
    unregister_chrdev_region(dev_num,   ndevices);
err_register_chrdev_region:
    return   ret;
}
void __exit dev_fifo_exit(void)
{
    int i;
    //删除sysfs文件系统中的设备
    for(i = 0;i < ndevices;i   ++)
    {
        device_destroy(cls,dev_num + i);
    }
    //删除系统中的设备类
    class_destroy(cls);
    //从系统中删除添加的字符设备
    for(i = 0;i < ndevices;i   ++)
    {
       cdev_del(&gcd[i].cdev);
    }
    //释放申请的设备号
    unregister_chrdev_region(dev_num,   ndevices);
    return;
}
module_init(dev_fifo_init);
module_exit(dev_fifo_exit);
头文件内容:
dev_fifo_head.h
#ifndef _DEV_FIFO_HEAD_H
#define _DEV_FIFO_HEAD_H
#define DEV_FIFO_TYPE 'k'
#define DEV_FIFO_CLEAN _IO(DEV_FIFO_TYPE,0x10)
#define DEV_FIFO_GETVALUE _IOR(DEV_FIFO_TYPE,0x11,int)
#define DEV_FIFO_SETVALUE _IOW(DEV_FIFO_TYPE,0x12,int)
#endif
Makefile :
ifeq ($(KERNELRELEASE),)
KERNEL_DIR ?=/lib/modules/$(shell uname -r)/build
PWD :=$(shell pwd)
modules:
    $(MAKE) -C $(KERNEL_DIR)   M=$(PWD) modules
.PHONY:modules clean
clean:
    $(MAKE) -C $(KERNEL_DIR)   M=$(PWD) clean
else
    obj-m := dev_fifo.o
endif
应用程序:
#include <stdio.h>
#include <stdlib.h>
#include <sys/types.h>
#include <string.h>
#include <sys/stat.h>
#include <fcntl.h>

int main(int argc, const char *argv[])
{
    int fd ;
    int n;
    char buf[1024] = "hello   word";

    fd = open("/dev/dev_fifo0",O_RDWR);
    if(fd < 0){
        perror("Fail   ot open");
        return   -1;
    }
    printf("open   successful ,fd = %dn",fd);
    n = write(fd,buf,strlen(buf));
    if(n < 0){
        perror("Fail   to write");
        return   -1;
    }
    printf("write   %d bytes!n",n);
    n = write(fd,buf,strlen(buf));
    if(n < 0){
        perror("Fail   to write");
        return   -1;
    }
    printf("write   %d bytes!n",n);
    return 0;
}
测试步骤:
- (1) 加载模块
sudo insmod hello.ko
(2) 创建设备节点
sudo mknod /dev/hello c 250 0
如果代码中增加了自动创建设备节点的功能,这个步骤不要执行。
(3) 测试字符设备
gcc test.c -o runsudo ./run
本站原创文章,作者:小 编,如若转载,请注明出处:https://www.mzbky.com/2982.html
 微信扫一扫
微信扫一扫  支付宝扫一扫